Вступление
Когда мы смотрим на водоем с берега, мы подмечаем различные перспективные участки, такие как погруженные в воду ветви дерева, притопленные кусты, заросли тростника, небольшие островки и так далее, которые просто кричат "тут есть рыба!". Но что насчет невидимой глазу территории, которая находится под поверхностью воды? Или когда ваше озеро не имеет никаких видимых глазу интересных особенностей?
Другой вопрос, который вы можете задать себе - какие глубины есть в озере? Насколько они однообразны? Есть ли тут перепады, бровки или ямы? Нет ли на дне каких либо плато или гравийных насыпей? Из чего состоит дно - гравий, глина, ил, водоросли и как все это расположено?
Ответ на все эти вопросы может быть получен с помощью маркерного удилища и поплавка маркера.
Что же такое поплавок-маркер?
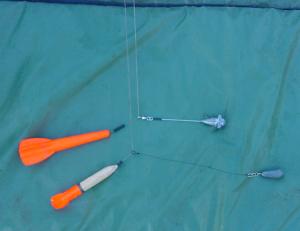
Обычно маркерный поплавок представляет из себя большой, хорошо заметный и очень плавучий поплавок, с нижним креплением и/или закрепленным на нем вертлюжком. Продаются практически во всех рыболовных магазинах и окрашены чаще всего в оранжевый или черный цвета. Также бывают разных форм, для работы с различными типами маркерных грузил. Я использую поплавки под грузила в 3 унции.
How do you set up a Marker-Float?
You’ll need a rod that’s stiff enough to punch out a fairly heavy lead, a reel preferably loaded with braid, a braid shock-leader, a fairly heavy lead, a marker-float and some rubber beads.
Setting up a basic marker-float is very simple, simply tie your shock-leader directly to the marker-float with a running lead being able to run freely up and down the shock-leader and mainline. Then tie the other end of the shock-leader to your mainline. It’s advisable to make up a 30cm/12inch link between the lead and a run-ring (or large swivel) that slides on your shock-leader and mainline. This link helps to keep the shock-leader and mainline above any weed that may be present.
 |
How do you use a Marker-Float?
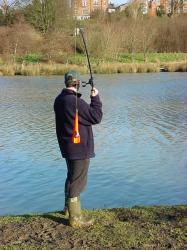 |
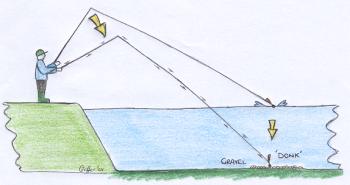
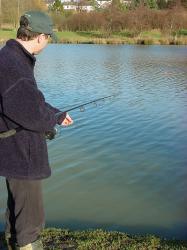
Once you have set up your marker-float it’s time to explore your swim. If you’re searching for a known feature then choose a point of reference on the far side of your swim or horizon, like a tree, pylon or church spire. Cast out your marker-float, overhead style, beyond where you think the underwater feature is by aiming for your chosen point of reference, say a tree on the far bank. If you don’t have any prior knowledge of your swim then fan out your casts in an arc to eventually cover the whole swim, making note of a point of reference for each cast. Once the lead
hits the surface of the water quickly flick over the bail-arm and
wind up any slack so that you’re in direct contact with the lead and
marker-float. Keeping the rod tip high, let the rod gently lower as
the lead pulls the tip down. Mono has too much elasticity and suppresses the vibrations. A coated lead will also suppress vibrations so either remove the coating or use a non-coated lead. |
 |
Feelings
|
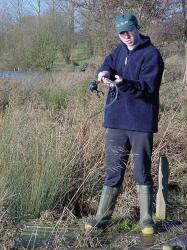
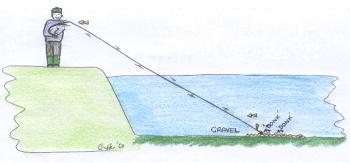
The feel of the touch-down depends on what the lakebed consists of in that place, for example if you feel a ‘donk’ then you’ve probably found gravel. If you feel a firm ‘thud’ then you’ve found clay. If you feel a soft ‘thud’ then you’ve found silt. If you feel the lead gently coming to rest on the lakebed without a ‘thud’ then you’ve found weed. Once the lead
has touched down you then turn side on to the water pointing the rod
at 90 degrees to the marker-float and tightening up. Then, by using
the rod only, pull the lead and marker-float along the lakebed about
3 yards at a time. If it feels like the lead is ‘sticking and skipping’ across the lakebed, then you’re pulling the lead across clay. If it feels like the lead is being pulled through ‘porridge’, then you’re pulling the lead through silt. |
 |
If the lead starts to snag up and gets harder and harder to pull along, then you’re in weed; you can actually feel the strands of weed snapping as you do this.
When you’ve found say gravel, you can then explore how long or wide it is by casting past it or either side of it using your points of reference on the far bank or horizon and by using the line-clip on your spool.
 |
Depths
Depths
 |
Once you have
set up your marker-float it’s time to explore your swim. If you’re
searching for a known feature then choose a point of reference on
the far side of your swim or horizon, like a tree, pylon or church
spire. Cast out your marker-float, overhead style, beyond where you think the underwater feature is by aiming for your chosen point of reference, say a tree on the far bank. If you don’t have any prior knowledge of your swim then fan out your casts in an arc to eventually cover the whole swim, making note of a point of reference for each cast. Once the lead
hits the surface of the water quickly flick over the bail-arm and
wind up any slack so that you’re in direct contact with the lead and
marker-float. Keeping the rod tip high, let the rod gently lower as
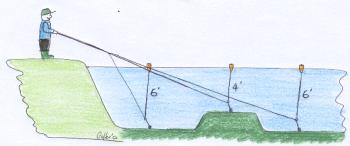
the lead pulls the tip down. Mono has too much elasticity and suppresses the vibrations. A coated lead will also suppress vibrations so either remove the coating or use a non-coated lead. You can also check the depth of that particular spot on the lakebed by pointing the rod in the direction of the marker-float and tightening up on the lead, then paying off line a foot at a time until the marker-float surfaces. Don’t forget to add the 30cm/12inch link to your depth. |
This works because the lead is ‘running’ on the shock-leader and main line, and will allow the float to rise when given line.
Using this method you can find gravel bars, plateaux, ledges and drop-offs by feeling along the bottom and then allowing the marker-float to rise. Note the depth and repeat on the next spot.
Building up a picture
Once you get the hang of what different lakebeds feel like and their depths you can then begin to piece together what’s in your swim. You can take notes or make sketches of the picture you have of the lakebed in relation to your points of reference.
 |
Baiting up
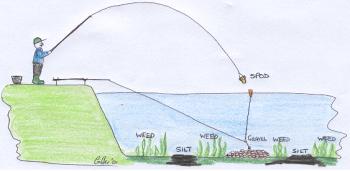
Once you have chosen a likely spot for your hook bait using your marker-float, you can leave it in position, say on top of a gravel bar or at the bottom of a drop off. With the marker-float marking the position of your feature you can cast to it with your baited rig and introduce freebies or use it as a ‘spodding’ marker.
Note - A ‘spod’, used for ‘spodding’, is a missile or rocket shaped object, which is tied directly to a heavy shock-leader. With the aid of the line-clip on your spool and using a marker-float you can introduce particles, pellets, boilies, etc, accurately up to a range of 100 yards without too much trouble.
 |
Conclusion
Once you’ve built up a picture of the lakebed using a marker-float and you have your points of reference you can then fish to the same spots time after time. I’ve seen anglers using two marker-floats to mark the width of a clear patch in the weed. Although I’ve never done this myself, it shows how other anglers use marker-float set-ups as part of their armory.
Whenever I visit a water to have a walk round I always take my marker-float set-up. If I see bubbles or a fish rolling I’ll then cast to where they are to see what feature attracts them to feed.
The only time that I will not use a marker-float is if I’m doing short sessions and its use might spook the fish. Saying that, on some waters the constant thrashing of the water attracts the fish! Another consideration is that other anglers might not want a marker-float crashing around the edges of their swim. If I am worried about spooking fish on a short session then I would do my feature finding after I’ve fished, ready for the next session.
Marker-float set-ups are a very valuable tool. After all, it’s what’s in the water that’s most important!
Tight Lines,
Garth Barnard a.k.a. Gaffer